Tuesday, December 20, 2011

Feeling Inspired

I'm feeling inspired to do something extra special for our Christmas trees. I absolutely adore all sorts of goodness about our small one, Cole -- who has just turned four years old. We have another little one on the way, expected to arrive in late April.

I think a fabulous way to touch on how fast their interests and personalities change is to buy or make one ornament a year that represents the personality of that year. I might extend this to a "firsts" ornament for later on.

So far, I have five ornaments to work on with Cole alone. And I'm floating with ideas!

1 month old (2007) – birth info + picture
1 year (2008) – Why are you upside down?
2 years (2009) – T-Rex or Snoopy
3 years (2010) – Baby Bird
4 years (2011) - Armadillo
, Volcano, or Mummies

At one month old, there's not much of an interest, or personality to work with. I want to do an ornament that announces his birth specs. I'm thinking including a picture would be amazing.
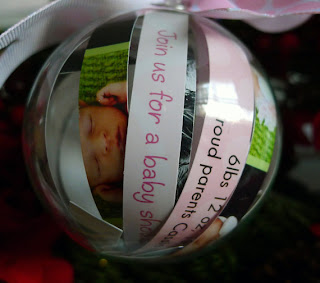
I love this ornament for inspiration. Found on etsy.

I love this picture of my small baby, although there are so many it's hard to pin down any one.

For one year, there's plenty of personality and love. I think a commonly enjoyed thing by Cole and in our family was Brandon flipping him upside down and saying, "Why are you upside down?" We have many, many pictures of this!

This is one picture of the cuteness at his sister's wedding back in May of 2008. My inspiration for this picture is having a sketch done of it and resizing it to a smaller size with the catch-phrase "Why are you upside down?" I'd love to put it into a miniature frame for safe-keeping and turn it into an ornament with a string.

These are two etsy artists I'm considering: here and here.

Cole's first "big" word occurred the day before his second birthday. It was dinosaur. No lisp. Clear as day. Dinosaur. He impressed his aunts and grandparents with proudly shouting dinosaur at his birthday party. That was the root of the obsession that still carries on over two years later!

I stumbled upon this ornament on etsy and it inspired me to create an ornament with one of the many plastic dinosaurs Cole has already.

I recalled a plastic animal ornament project that young house love completed this year and will likely use their tutorial for making my own dinosaur ornament. You can see that here.

Finally, I'll paint it green because that was and still is his favorite color.

Around the time that Cole was working towards three years old, he was obsessed with baby birds. I think it's interesting because his first real word was 'bird.' Even to this day, he role-plays as a baby bird.

There was a heart crushing moment where he happened to catch the speed-camera clip of a baby bird's body decomposing on "Creation" and flipped because the bugs were eating the dead baby bird. He is not Cole, he is baby bird.

I love this bird on etsy, although I could make a baby bird in a nest with a mushroom bird -- but this chickadee is so adorable and for $10, who couldn't want it?

So we arrive at year five -- age 4. This one is hard! His newest and longest kick this year has been baby armadillo. He role-plays as baby armadillo more often than baby bird now. It's his first preschool year, he loves baby animals and life sciences. He is obsessed with volcanos, mummies (yes -- the real, not halloween mummies), and information in general.

We're leaning towards an armadillo because it's so representative of who he is. We took photos with Trizza just today and the way we got smiles guaranteed was to have Cole should "baby armadillo!"

If I do an armadillo, I love this ornament on amazon for its' realism -- or I could do another plastic inspired young house love ornament like my t-rex up there.

Whatever the end case -- I'm looking oh-so-forward to hitting Michael's tomorrow to find my plastic little guys (Armadillo? T-Rex?) and depending on Brandon's feedback -- possibly a nest and mushroom bird.

I really love this idea and cannot wait to see what a variety I'll have on Cole's Christmas tree by the time he's an adult.
Monday, November 28, 2011

Christmas is in the Mail

So, you remember that we bought Brandon a TV and stand for Christmas? Well, our DVD player decided to stop working the day before Thanksgiving. Nice.

So on the evening of Thanksgiving, we ordered a new player on Costco. It's a blu-ray player that has a lot of cool perks to it and it was $20 off. Shipping was under $5. To save us from having to go to the store and pick it up, the $5 was well spent.

Last night, it was my turn to purchase my Christmas present. Since I decided to give my little sister my Canon Rebel xs for Christmas (at her request), I upgraded to a Canon 60D. I bought just the body since I have the nifty fifty that I got as a birthday present and it's compatible.

Since I'll be giving my sister the stock lens that came with my Rebel and I'm not thinking the lens is worth $150 to buy separate, I decided to get a lens that is better than the Canon stock but also compatible with the camera. I picked the Tamron 18-270mm.

Then we decided to finally figure out what to give Cole for Christmas. We knew that we wanted developmentally friendly toys, as we're trying to push away from media influenced or electronic toys. Initially, we thought to buy him a postman outfit so he could deliver letters (encouraging writing).

But we settled on a vet kit and a vet outfit from Lakeshore Learning.

Finally, I wanted to get him some interesting new books. He loves books and cannot get enough about animals. I decided to go classic with some of my favorite childhood books. We got him these four by Ruth Heller.

How to Hide a Crocodile (& other reptiles)

How to Hide an Octopus (& other sea creatures)

How to Hide a Butterfly (& other insects)

How to Hide a Meadow Frog (& other amphibians)

The last book we got was related to American Indians. The history and culture of how they lived over various tribes. Cole is American Indian through Brandon and we've really wanted to start teaching about that diversity.

The Very First Americans

I'm undecided on if we'll be doing a stocking for Cole at our house. My mother always over-stuffs and is planning a stocking for the grandchildren already. I'm thinking we'll skip it this year.

For my side of the family, there was a drawing. I got my sister, Crystal. I had it on good authority that she has been coveting these shelves.

I bought her one of them (mostly because they have to be shipped and to buy two, I was looking at $18 in shipping alone!). I'm sure she's going to be thrilled.

On Brandon's side of the family, I drew his father. His father is into all things fishing and I'm going to keep my eyes out for something related that he doesn't have and would enjoy.

We have to get gifts for the kids under 18 on both sides of the family. We also visit my Aunt's house on my Dad's side and there are three children there.

For my 10 year old cousin, we got Mars Sand. It doesn't get wet and makes sculptures under water. Very cool!
For my 6 year old cousin, we got some Littlest Pet Shop Lambs (they raise sheep).
For my 17 year old cousin, we're going to gift him with cash. As a teen, there was nothing I loved more than getting cash to buy what I wanted.

For Brandon's side:
Niece #1: A disney princess outfit for the princesses she got for her birthday.
Niece #2: An ice dragon webkinz (she's a collector and let it spill on black friday dinner that she wants this one very badly to marry her boy webkinz dragon).
Nephew: A lego-style Transformer kit

My side:
Nephew: We heard he's very into spy things. I bought him a pen that has invisible ink for writing secret messages. He has a special light attached to the pen to read his message.

Finally: My Parents. They're getting family photos with all of their children done professionally. And with that, I conclude our Christmas shopping. One present to go!

Tuesday, November 22, 2011

Winter Photos

So, we're planning some more family photos with Trizza! I'm always so excited to put together ideas for the photos and my absolute favorite part is reviewing the photos a couple weeks after.

We want snow pictures and there is so many inspiration shots by doing a simple google search for family winter portraits.

My mother wants us to go casual with black, navy blue, and gray so we pop against the snow. I haven't decided for certain what my outfit will be, but I do have a few select pieces in mind already.

I own this dress:

I own this jacket:

I'm thinking leggings in a gray with some sort of pattern that doesn't look too wild for the classic look of the peacoat. I'm loving the sweater style leggings/tights.
Also, a possible scarf and some gloves. I'm loving this scarf:

I'm not sure if I'd pair my new black, short boots with this ensemble or if this will even be my ensemble. We shall see!

I really should start planning the boys' outfits.

Sunday, November 20, 2011

New TV Stand

So, I've really slacked on posting updated pictures! School is kicking my butt as it's wrapping up in the last month. That means a whole bunch of quizzes, exams, and final presentations or projects. I'm ready for the month break over the holidays certainly!

You can see the TV update here, or scroll down two posts.

And, here's some pictures of the pretty final product.

I'm quite pleased with how everything turned out. I think the stand is beautiful! I think the TV looks great on it.

(Excuse the mess of cords to the left -- the desk and its' contents are constantly being moved about)
Now to find something decorative to put on those open front shelves. Hmm.

Wednesday, November 2, 2011

Repairing Water Damage to the Wall - Living Room Update

So on my big list of to do's to the living room, we included repairing the water damage to our living room wall. Here's the backstory:

We told our landlord that there was leaking from our AC unit into our house. It would go about twenty minute and have a steady drip straight onto our outlet! Not very safe. Frightening, actually. It was summer and it was in the 100's and it was out of the question to ignore our AC unit. Brandon thought it was tilted forward rather than backward and that's why water was coming downhill to us. The landlord said he just installed the unit and that couldn't be it.

His solution: Put a towel under the unit so the water will be forced out the backside outside. Well, okay.

It worked! We ran it for hours and had no visible or audio of water dripping. Hurray! But it was unsightly. The next morning when we came out to our living room, we saw this:


Yeah. The water had been forced into our wall, underneath the paint forming a huge pocket of water. The landlord was e-mailed pictures of the damage and he told us to break open the water sac, let it air dry out and we could repaint later.

Brandon has been painting with his father for close to 10 years now. He did not think this was a good solution. With the landlord's permission and our promise to pay if we further damaged the place, Brandon and his dad agreed to fix this themselves.

With his father, they broke the caulking on the frame around the unit, unscrewed it and re tilted the unit. Not a lick of leaking since. It was a tilt issue.

After breaking the water bubble and letting it air dry, a few things were apparent: we would have to cut off the excess paint that was now dried out and warped beyond saving. We would also have to re-mud the wall since the water damaged down to the sheet rock. In addition to re-mud, we'd need to re-texture the damaged area, prime it and finally paint over it.

Well, on this past Sunday, I told B it was past time to fix that ugly wall. His father came over with his painting tools and they got to work.

On Sunday, they:

- cut off the warped paint portion

- mixed up wall mud and applied it to the gaping hole (it was probably 6" x 24")

- sprayed new texture over the dried mud

On Monday, Brandon:

- applied primer to the new texture
- applied the first coat of paint

Today (Tuesday), Brandon:
- finished touching up the paint

And we have a beautiful looking wall. The photo appears shiny because I took a picture with the wet touch-up paint just applied. After drying, it will look like the rest of the wall.

You can't tell that there was ever a hole in the wall.

Still to-do:


- Re-caulk the frame around the AC unit
- Putty in screw holes (at landlord's request)
- Repaint the frame

I think this looks a heck of a lot nicer than the landlord's suggestion of cut it off and paint over the hole. Uhm, yeah.

Tuesday, November 1, 2011

TV Update - Living Room

Remember a while back when I mentioned wanting to update our current TV stand in all of its' dullness? You can see that here.

Well, that is no longer a case here! Brandon's Christmas present this year is a flatscreen TV. He's been wanting one for a very long time and we planned to get one on sale for Black Friday. Well, Costco has a great deal that my Dad recently took advantage of and has really enjoyed so today we decided to make the jump a little early. He's getting a 55" LCD HDTV. To say he's excited is a bit of an understatement.

But a new TV means a new stand necessary. I spent the better part of a hour or so online looking at Ikea, Target, even Walmart for a stand that met my criteria (or close to) at a price that wouldn't rival that of our TV. I finally resorted to google and found a website, tvstands.com. They offered wood furniture in color tones I'm looking for with a huge assortment with free shipping. The price ranges are quite reasonable compared to the other places I was looking to shop.

My criteria:

- Cabinets (I want to "hide" our xbox, cable box, and DVD players)
- Open shelving for some decorations
- Black or very dark finish
- Must have some height
- Any hardware must be silver
- Must be at least 60" for dead table space on either side of TV
- Price must be below $300, preferably less than $270

I ended up settling on this:

I can handle the tinted cabinets over just clearly see-through ones. I love the space for storage and for electronics. I think this TV will fit into our house quite nicely. Now, if I can just talk the boy into refinishing my other furniture to match!

Now, we have a 55" TV sitting on the floor of our living room while we wait on a stand to arrive.

I'll post pictures whenever we get around to assembling our new stand and settling our living room again.

Sunday, October 30, 2011

News

I'm not quite sure where to begin. I guess I can begin with a cute picture or two.

"I have something to tell you"

"I'm going to be a Big Brother"

The shirt was fun. I just used iron on transfers to create it. It fits Cole's personality amazingly. He still plays as a 'baby bird' on the regular so it was naturally what should have a little secret and announce a pregnancy.

Our tentative due date is April 28th, 2012 which can cause some complications with my Spring semester so I'm working on a back up plan as it is. I was hoping to enroll in online courses but my field only has one course online at this time that I haven't taken. My general ed course isn't available this semester.

I don't want to have a baby early when I have on-campus classes and lab work. I don't want to have a baby in finals weeks either. I don't want to do only one course for my "big" semester. I don't want to take a break this early (I planned to take the whole summer off with the newborn and go back to school in the Fall). I don't want to take an "in progress" and be delayed until the following large semester. I'm just stuck a little bit.

I'll plan to talk with a counselor, get some answers and make my decision. Enrollment starts next month so I have a little bit of time to decide what I'm going to do.

In other news: My little sister is moving home in February and just in time to be around for her new little niece/nephew! She is visiting for Christmas this year and it will be the first time in four years I've seen her at the holidays. I'm quite excited.

I'm planning our twice annual family photos for the Winter and I'm thinking to incorporate my whole family as a surprise for Mom/Dad. They haven't had professional photos of their four daughters since we were children. Now they'll have pictures with their grandchildren as well. More on planning for photos later!

I promise I'll try to be less neglectful and pick up the blogging world again.

Wednesday, September 28, 2011

I'm still alive!

Just wanted to drop in and say that I'm still alive. Life has gotten busy. I'm in school full-time again, plus I've taken on watching another 3 year old for a friend on two days of the week. The hours are harsh -- we're watching him for almost 12 hours and he gets picked up as late as midnight the night before our morning classes kick off on Thursdays. Ouch!

I wish I could say that I'm being productive with crafts, but I'm having to put those on pause as well! I should be announcing a big deal within the next three weeks, as well as picking up the crafting and posting a little bit as well.

Saturday, August 13, 2011

Current Bathroom & To-Do

Have a mini tour of our bathroom. The bathroom is probably the most complete room I have, which makes me a little sad. I do enjoy the challenge of adding more. I never really feel a room is complete.

Upon walking in, you're in front of the long sink.

To your right on the wall is this jewel.

Past the long sink is the bath toy bin. We're in the process of changing this to match. The stool is from IKEA and quite conveniently matches.

Above the toilet rests these wall cubes. In them are two salt and pepper sets. When my Grandmother passed this January, I took them from her estate because they reminded me of her. I remembered seeing them from the time I was a small child.

Across from the toilet is our new mirror! I took this picture standing in the shower.

And speaking of the shower.

Here is the To-Do list I never posted before. I made this list within the last month. There is very little left to do in the bathroom.

Bathroom To Do

-
Add interest piece above towel rack (Seen here)
- Add some decorative element to counter (Seen here)
- Paint Bath Toy Bin
- Create Fabric insert for Bath Toy Bin


With regards to painting the bath toy bin, I've currently dismantled the silly thing. It requires some sanding before painting so I've put the brakes on that for a day or two. Too much painting is never a good thing and we've had quite the time with paint lately.

I also haven't picked a fabric for the toy bin. It needs to be water resistant or water protected since the nature of the bin is for water related toys.

Friday, August 12, 2011

More Painting Projects

Since we picked up Martha Stewart's "Sisal" which was a perfectly light tan, I decided to repaint my "Welcome" sign.

When I began it years ago, I never finished it. It desperately needed an extra coat and I never even painted the ends!

Here it is in all its' glory now. I love it. I gave it two coats of "Sisal."

I also had this light blue "Family." In our Utah home, I had it sitting in my blue kitchen, so the color worked well. That light blue didn't shine so pretty in my living room -- which has navy tones. Since we had that gorgeous "Rich Navy" by Glidden on hand for the umbrella tin, I decided to repaint it with the navy paint.

I had to do three coats of this for it to show even. Photographing in the light, it looks "brighter" than the color is in person.

If you look at my umbrella tin navy, it is more true to the color.

An updated list of my Living Room To-Do

Living Room Still To Do:

- Hem the bottom of the curtains so they're at floor, but not piled up  (Seen here)

- Finish tie-back for the blinds  (Seen here)

- Repair the water damage on the wall under the AC unit (go bad landlord!)
- Move the boxes to the left of the media cabinet to storage
- Put new slipcovers on the sofas (when they get here agh!) (Seen here)
- Stain the furniture a nearly black color
- Add pillowcases to the throw pillows (Seen here)
- Acquire four more throw pillows
- Organize the media bookcase (buy some of these and store all of our dvd cases in storage -- cutting down on so much shelf space!) Update: We've bought two  four seven of them and want three one more to finish compiling our storage.
- Make cloth "curtain" for the media bookcase
- Acquire some sort of decorative element for the lamp shelving (Seen here and here)

- Build onto entertainment center (as seen here)
- Build entry storage case (as seen here) (Improvised here and a better shot here)
- Use extra paper from clock project to categorize the DVD storage cases.
- Finish pillowcases for new throw pillows
- Cut down dogwood branches in umbrella tin (Seen here)
- Get another basket for the shoe shelves (Seen here)
- Finish "word art" to hang above the shoe shelves
- Paint TV trays fun color like "Navy"
- Paint umbrella bucket with stripes (Navy?) (Seen here, here, and here)

- Finish "H" art to fill in hole of shoe cabinet

Thursday, August 11, 2011

Goodwill Refinish -- Part Two


Our Before

The Honky Wire

Here's the after picture.


And you can see it in all of its' glory in a new home: the bathroom.

I love this mirror now! It was worth every penny of the $3.48 at Goodwill. Every time I walk into our bathroom, it makes me smile. It looks so good in person.

Paint Color: Martha Stewart's Sisal (in Glidden Eggshell base).

You can view the progress here.

Wednesday, August 10, 2011

Goodwill Refinish -- Part One


I really hated this bare spot in our bathroom. I know that not every wall needs to be covered, but there was nothing remotely interesting going on in our bathroom. I wanted something that could be relocated anywhere in the house, so art was out. I also really didn't want to overwhelm the bathroom in art since it's such a small space.

I thought about finding a mirror. Since the mirror would have placement above the towel rack, I wanted to be sure that it wasn't the same length as the towel rack. Fortunately, we struck lucky and found a supremely cheap mirror at Goodwill ($3.48) and it's a couple inches longer than the towel rack. The frame is also real wood so it's hefty to hoist!

I didn't like the coloring and there was a sticker and vinyl car on it. Those had to go!

After a good shining with Windex, we were off to framing the mirror with Frog Tape.

We threw a coat of Primer on the mirror. It's interior primer/paint (Ultra White) by Behr in a sample size.

I then booked over to Home Depot to get a sample size of our chosen color. It's Martha Stewart's Sisal. They were out of Martha Stewart eggshell base, so they substituted Glidden's base eggshell. It's a very light sandy tan. I apologize for the color being off on screen.

I really love the color. Here's the mirror after our first coat. We're planning to add one more. The eggshell base has finishing agents in the paint so we won't need to worry about any sealant coats.

I can't wait to let this baby dry overnight and fix the wire so it can hang wide instead of high. There's holes on the wide sides so whoever had it before took it apart and changed the wire siding. We're taking it back!

I'll post pictures of the after in the next day or two when we get the final coat on and mount it. I'm in love!